Seed Tray Complete Guide
What Are Seed Trays?
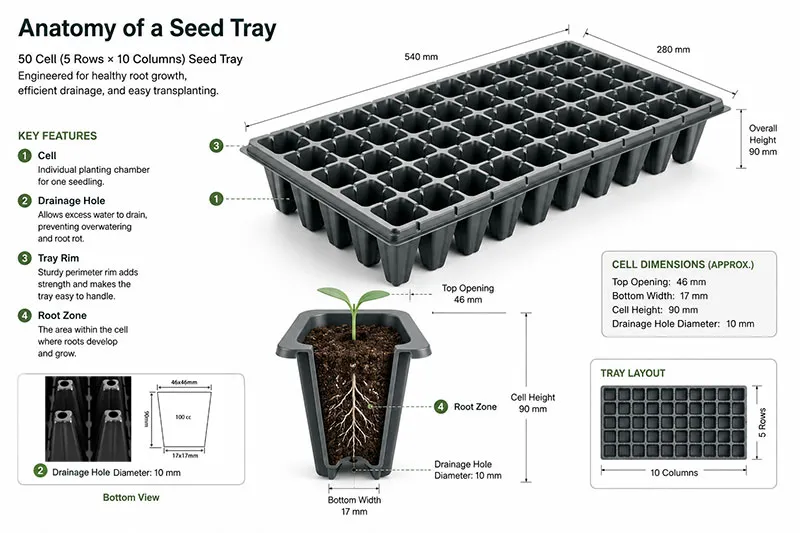
Seed trays are shallow containers built for starting seeds in a controlled environment. They can improve germination rates and save space. Growers plant healthy seedlings before transplanting them outdoors or into larger pots.
Most seed trays contain multiple planting cells. Each cell holds one or more seeds and a small amount of seed-starting mix. This setup keeps roots organized and reduces transplant shock.
People also call them:
✅ Seed starter trays.
✅ Seed starting trays.
✅ Seedling trays.
✅ Plug trays.
✅ Cell trays.
Seed trays help growers control several important growing conditions, including:
✔️ Moisture.
✔️ Temperature.
✔️ Air circulation.
✔️ Light exposure.
✔️ Soil consistency.
They are widely used for:
✅ Vegetables.
✅ Herbs.
✅ Flowers.
✅ Native plants.
✅ Commercial nursery production.
Starting seeds in trays also extends the growing season. Growers can begin planting indoors weeks before the last frost date.
Most seed trays work with accessories such as:
✔️ Humidity domes.
✔️ Bottom trays.
✔️ Heat mats.
✔️ Grow lights.
Some trays are reusable plastic trays. Others are biodegradable for direct planting.
Seed trays are especially useful for crops that benefit from transplanting. For example, tomatoes, peppers, lettuce, basil, and many flowers. However, not every crop performs well in trays. Root-sensitive plants often grow better if you directly sow them outdoors.
👉 Need reusable seed trays? Please click "Plastic Seed Trays" to explore our complete product range.
Types of Seed Trays & Cell Trays
Seed trays come in many styles, sizes, and cell configurations. Choosing the right type helps improve germination, root development, and transplant success.
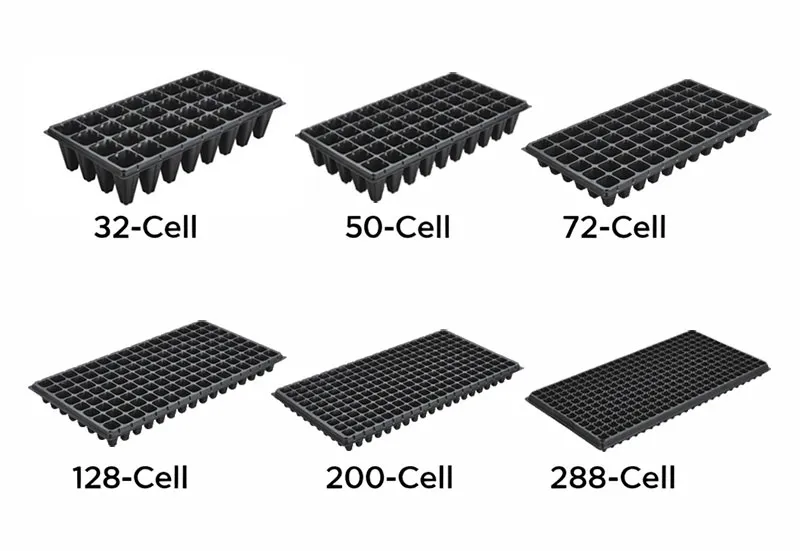
The most common type is the standard cell tray. These trays contain multiple individual cells. This separates seedlings and prevents roots from tangling together.
Common cell counts include:
✅ 6 cell trays.
✅ 15 cell trays.
✅ 24 cell trays.
✅ 32 cell trays.
✅ 40 cell trays.
✅ 50 cell trays.
✅ 72 cell trays.
✅ 98 cell trays.
✅ 104 cell trays.
✅ 105 cell trays.
✅ 128 cell trays.
✅ 162 cell trays.
✅ 200 cell trays.
✅ 288 cell trays.
Large cells work well for bigger seedlings. For example, tomatoes, peppers, cucumbers, and squash. Small cells are better for lettuce, herbs, onions, and flowers.
Standard Seed Trays
Standard trays are lightweight and affordable. Most growers use them for starting vegetables and flowers indoors.
They usually pair with:
✔️ Humidity domes.
✔️ Bottom watering trays.
✔️ Seedling heat mats.
Deep Cell Trays
Deep cell trays provide extra root space. They work well for crops with longer roots or seedlings that stay in trays for extended periods.
Good choices for deep cell trays include:
✅ Tomatoes.
✅ Peppers.
✅ Eggplant.
✅ Perennial flowers.
Plug Trays
Commercial growers often use plug trays for mass propagation. These trays may contain 72, 128, or even 200+ cells. Plug trays save space and improve production efficiency.
Seed Trays With Lids
Some trays include clear humidity domes or lids. These covers help retain warmth and moisture during germination. However, excess humidity can increase mold risk if airflow remains poor.
Biodegradable Seed Trays
Biodegradable trays break down naturally in soil. Growers can transplant them directly into raised beds or containers.
Common materials include:
✔️ Peat.
✔️ Coconut coir.
✔️ Paper fiber.
These trays reduce root disturbance but dry out faster than plastic trays.
Open Flats
Open flats contain no individual cells. Growers use 1020 trays for:
✅ Microgreens.
✅ Dense flower sowing.
✅ Early seed germination.
Seedlings later move into larger containers or cell trays.
Seed Tray Materials
Seed tray materials affect durability, drainage, moisture retention, and root health. Some trays work better for beginners, while others suit commercial growers or specific crops.
Plastic trays remain the most popular option. They are lightweight, reusable, and easy to clean. High-quality plastic trays can last for multiple growing seasons when properly sanitized after use.
Plastic Seed Trays
Plastic seed trays are ideal for:
✅ Indoor seed starting.
✅ Vegetable seedlings.
✅ Repeated seasonal use.
They resist moisture damage and support bottom watering systems well. However, thin plastic trays may crack over time.
Silicone Seed Trays
Silicone trays make seedling removal easier because the flexible cells release roots without damage.
These trays work especially well for:
✔️ Delicate seedlings.
✔️ Frequent transplanting.
They usually cost more than standard plastic trays.
Biodegradable Trays
Biodegradable trays reduce transplant shock because growers can plant the entire container directly into soil.
Common materials include:
✅ Peat.
✅ Cow manure fiber.
✅ Coconut coir.
✅ Recycled paper pulp.
These trays improve convenience but often dry out faster than plastic options.
Important Seed Tray Features
When choosing seed trays, several features matter more than appearance.
Drainage Holes
Good drainage prevents root rot and fungal diseases. Excess water should leave the tray quickly.
Poor drainage often causes:
✔️ Mold.
✔️ Damping off.
✔️ Algae growth.
Humidity Domes
Clear lids help maintain moisture and warmth during germination. They improve sprouting speed for many vegetables and flowers. However, growers should remove domes after seedlings emerge to improve airflow.
Tray Depth
Shallow trays suit fast-growing crops with small roots. Deep seed trays support stronger root systems and larger seedlings.
Bottom Watering Compatibility
Many growers prefer trays that fit bottom watering systems. Bottom watering keeps foliage dry and reduces disease risk.
Reusability
Reusable trays lower long-term costs and reduce waste. Commercial nurseries often prefer thicker reusable trays for durability and consistent performance.
Seed Tray Sizes & Cell Sizes
Seed trays come in many sizes and cell configurations. The right size depends on the crop, root depth, growing time, and available space. Most seed trays contain individual planting cells. Each cell supports one seedling and helps prevent root competition.
Common tray sizes include: 6-cell trays, 15-cell trays, 24-cell trays, 32-cell trays, 40-cell trays, 50-cell trays, 72-cell trays, 98-cell trays, 104-cell trays, 105-cell trays, 128-cell trays, 162-cell trays, 200-cell trays, 288-cell trays.
Large cells provide more room for root growth. Small cells maximize planting space and work well for high-volume seed starting.
👉 Swipe the table left/right to view all size details.
| Cell Count Range | Density Level | Common Applications |
|---|
| 4–12 Cells | Extra Large Cell Trays | Cucumbers, Melons, Squash, Large Vegetable Seedlings |
| 15–32 Cells | Large Cell Trays | Tomatoes, Peppers, Eggplant, Nursery Plants |
| 36–72 Cells | Medium Cell Trays | Vegetables, Herbs, Flowers, General Propagation |
| 98–144 Cells | High-Density Trays | Lettuce, Brassicas, Herbs, Commercial Greenhouses |
| 162–288 Cells | Ultra High-Density Trays | Plug Production, Flower Seedlings, Mass Nursery Propagation |
|
👉 Not sure which tray size fits your plants? Read our complete Seed Tray Size Guide.
Small Cell Trays
Small cell trays usually contain 72 to 128 cells. Growers often use them for:
✅ Lettuce.
✅ Basil.
✅ Onions.
✅ Celery.
✅ Flowers.
These trays save space under grow lights and work well for fast-growing seedlings.
However, seedlings dry out faster because each cell holds less soil.
Large Cell Trays
Large cell trays contain fewer but deeper cells. They support stronger root systems and longer indoor growing periods.
Good crops for large cells include:
✔️ Tomatoes.
✔️ Peppers.
✔️ Cucumbers.
✔️ Squash.
✔️ Eggplant.
Larger cells also reduce transplant stress because roots have more room to develop.
Deep Cell Trays
Deep trays work best for plants with long roots or slower early growth.
Growers often use them for:
✅ Tomatoes.
✅ Peppers.
✅ Native plants.
✅ Perennials.
Deep cells improve drainage and reduce root binding.
Open Flats
Open flats contain no separate cells. Growers use them for:
✔️ Microgreens.
✔️ Dense flower sowing.
✔️ Early germination.
After sprouting, growers transplant seedlings into larger containers.
Choosing the Right Cell Size
In general:
✅ Small seeds work well in smaller cells.
✅ Large seedlings need deeper cells.
✅ Long indoor growing periods require more root space.
Using oversized cells wastes soil and tray space. Using undersized cells may stunt growth.
How to Choose the Right Seed Tray
Choosing the right seed tray improves germination, root development, and transplant success. The best tray depends on your plants, growing space, and gardening goals.
Start by considering what you plan to grow. Fast-growing crops with shallow roots usually perform well in smaller cell trays. Larger vegetables often need deeper cells and more soil volume.
Choose Tray Size Based on Plant Type
Large seedlings need more root space.
Good candidates for deep or large-cell trays include:
✅ Tomatoes.
✅ Peppers.
✅ Eggplant.
✅ Cucumbers.
✅ Squash.
Small-cell trays work well for:
✔️ Lettuce.
✔️ Herbs.
✔️ Onions.
✔️ Flowers.
Root-sensitive crops usually grow better when directly sown outdoors. For example, carrots and parsnips.
Consider Indoor Growing Time
Seedlings that stay indoors for several weeks need larger cells. Extra soil volume helps prevent root binding and nutrient stress. Short-term seedlings can grow successfully in smaller trays.
Think About Watering Needs
Smaller cells dry out faster than larger ones. Growers who cannot water frequently may prefer deeper trays with better moisture retention. Bottom watering systems also work better with sturdy trays and compatible bottom trays.
Choose the Right Material
Plastic trays are durable and reusable. Silicone trays simplify seedling removal. Biodegradable trays reduce transplant shock. Commercial growers often prefer reusable heavy duty seed trays for long-term use.
Check Important Features
Before buying a tray, look for:
✅ Drainage holes.
✅ Strong tray walls.
✅ Compatible humidity domes.
✅ Bottom watering support.
✅ Adequate tray depth.
Poor drainage often leads to mold and damping off.
Match Trays to Your Growing Setup
Indoor growers often need trays that fit:
✔️ Grow lights.
✔️ Heat mats.
✔️ Shelving systems.
✔️ Humidity domes.
Outdoor growers may prioritize durability and weather resistance.
Commercial Seed Tray Applications
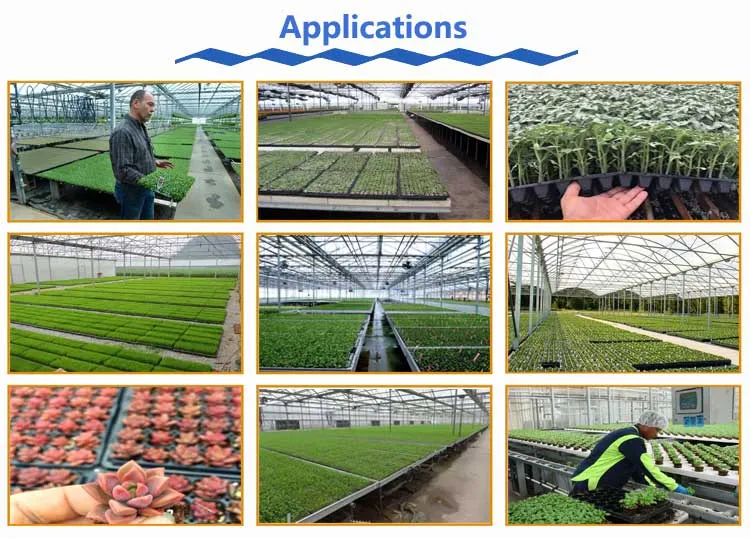
Seed trays are not only used by home gardeners. They are also essential tools in commercial horticulture, greenhouse production, and large-scale plant propagation.
Commercial growers use seed trays to improve germination consistency, maximize growing space, and produce uniform seedlings for transplanting.
Greenhouse Propagation
Greenhouses often use plug trays and cell trays to produce thousands of seedlings in a controlled environment.
Benefits include:
✅ Higher germination rates.
✅ Better environmental control.
✅ More efficient use of bench space.
✅ Uniform crop development.
Standardized tray systems also simplify irrigation, fertilization, and crop scheduling.
Vegetable Transplant Production
Commercial vegetable growers often start crops in trays before transplanting them into fields, tunnels, or greenhouses.
Common crops include:
✔️ Tomatoes.
✔️ Peppers.
✔️ Lettuce.
✔️ Cabbage.
✔️ Broccoli.
Using trays helps growers produce stronger root systems and achieve more uniform field establishment.
Commercial Flower Production
Flower growers frequently use plug trays to start annuals, perennials, and bedding plants.
High-density trays reduce production costs while maintaining consistent plant quality.
Many commercial operations transplant flowers into larger pots once roots fill the cell.
Hydroponic Propagation
Many hydroponic systems begin with seedlings grown in propagation trays. Lettuce, herbs, leafy greens, and specialty crops are commonly started in trays before moving into NFT, raft, or vertical growing systems. Uniform seedlings help improve crop consistency and harvesting efficiency.
Nursery Operations
Plant nurseries use seed trays to propagate trees, shrubs, ornamentals, native plants, and landscape crops.
Commercial trays help nurseries:
✅ Increase production capacity.
✅ Improve labor efficiency.
✅ Simplify plant handling.
✅ Produce uniform transplant-ready plants.
For many growers, seed trays are one of the most cost-effective tools for large-scale propagation.
Heavy-Duty vs Standard Seed Trays
Not all seed trays are built the same. Tray thickness, material quality, and manufacturing methods can significantly affect durability and long-term value.
Commercial growers often choose between standard trays and heavy-duty trays based on production requirements and reuse expectations.
👉 Swipe the table left/right to view all information details.
| Feature | Standard Trays | Heavy-Duty Trays |
|---|
| Initial Cost | Lower | Higher |
| Durability | Moderate | Excellent |
| Reuse Cycles | Limited | Multiple Seasons |
| Transportation Strength | Moderate | High |
| Commercial Production | Suitable | Ideal |
|
Tray Thickness Matters
Thicker trays resist bending, cracking, and deformation during production and transportation. This becomes especially important when trays carry large seedlings or move frequently through greenhouse operations.
Reusability and Lifespan
Standard trays often perform well for short-term use. Heavy-duty trays can survive repeated cleaning, sterilization, and growing cycles. Many commercial nurseries use heavy-duty trays for several years when properly maintained.
Commercial Return on Investment
Heavy-duty trays typically cost more upfront. However, lower replacement frequency often reduces long-term production costs. For large operations, durability can significantly improve overall profitability.
Transportation Performance
Strong trays help protect seedlings during handling, storage, and shipping. Reduced tray damage often means fewer plant losses and lower operational costs.
Seed Tray Manufacturing Materials
Seed trays are manufactured from several different plastic materials. Each material offers unique advantages in strength, flexibility, durability, and cost.
PP (Polypropylene)
Polypropylene is one of the most widely used materials for reusable seed trays.
Advantages include:
✅ Excellent durability.
✅ Good chemical resistance.
✅ High impact strength.
✅ Long service life.
PP trays are commonly used in commercial nurseries and greenhouse operations.
PS (Polystyrene)
Polystyrene is lightweight and economical. Many high-volume propagation trays use PS, which offers good consistency and competitive manufacturing costs. However, PS seed trays are generally less durable than PP trays.
PET (Polyethylene Terephthalate)
PET trays provide excellent clarity and recyclability. Some growers choose PET trays when sustainability and material recovery are important considerations. PET also offers good dimensional stability during production.
Thermoformed Seed Trays
Thermoforming creates trays by heating plastic sheets and shaping them into specific cell configurations.
Advantages include:
✅ Lightweight design.
✅ Lower production cost.
✅ Wide cell-size options.
✅ Efficient large-scale manufacturing.
Thermoformed trays are widely used for commercial plug production.
Injection Molded Seed Trays
Injection molding produces stronger and thicker trays with excellent structural integrity.
These trays typically offer:
✔️ Longer lifespan.
✔️ Better rigidity.
✔️ Greater resistance to cracking.
✔️ Improved reusability.
Commercial growers often choose injection-molded trays when durability is a priority.
Wholesale Seed Tray Buying Guide
Choosing the right wholesale seed trays involves more than selecting a cell count. Commercial buyers should evaluate production requirements, tray specifications, durability, and supplier capabilities.
Determine Your Production Goals
Start by identifying:
✅ Crop type.
✅ Growing cycle.
✅ Production volume.
✅ Greenhouse space.
Different crops often require different cell sizes and tray depths.
Choose the Right Cell Configuration
Cell count directly affects root volume, production density, and holding time.
General guidelines include:
✔️ 32–50 cells for large vegetable transplants.
✔️ 72 cells for general vegetable production.
✔️ 128 cells for lettuce and herbs.
✔️ 162–288 cells for high-density propagation.
Evaluate Tray Dimensions
Tray dimensions should match existing greenhouse benches, irrigation systems, and transport racks.
Standardized sizes often improve operational efficiency.
Consider OEM and Customization Options
Many manufacturers offer customized solutions, including:
✅ Custom cell layouts.
✅ Customized tray depth.
✅ Embossed logos.
✅ Private-label production.
✅ Color customization.
Understand MOQ Requirements
Minimum order quantities vary by tray type and customization requirements.
Custom molds and private-label projects often require higher MOQs than standard products.
Review Packaging and Shipping
Packaging affects transportation costs and product protection.
Before placing large orders, confirm:
✔️ Packaging method.
✔️ Carton quantity.
✔️ Pallet configuration.
✔️ Container loading capacity.
A reliable supplier should provide clear specifications, quality consistency, and stable lead times for long-term production planning.
How to Use Seed Trays
Seed trays make seed starting easier, cleaner, and more efficient. Proper setup helps improve germination rates and produce stronger seedlings.
Step 1: Choose the Right Tray
Select a tray based on:
✅ Plant type.
✅ Root depth.
✅ Indoor growing time.
✅ Available space.
Deep trays work best for larger seedlings. Small-cell trays suit herbs, lettuce, and flowers.
Step 2: Fill the Tray With Seed Starting Mix
How to fill seedling trays? Use a light, well-draining seed-starting mix instead of regular garden soil.
A good mix should:
✅ Hold moisture evenly.
✅ Drain excess water.
✅ Allow root airflow.
Fill each cell completely, then lightly press the soil to remove large air pockets. Do not compact the mix too tightly.
Step 3: Plant the Seeds
How to plant seeds in seed trays? Place seeds at the proper depth. Most seeds grow best when planted at a depth about two times their diameter.
Small seeds often need only a thin soil covering. Large seeds usually require deeper planting.
After sowing, lightly cover the seeds with seed-starting mix or vermiculite.
Step 4: Water Carefully
Water gently after planting. Avoid washing seeds out of place. Many growers prefer bottom watering. It keeps foliage dry and reduces disease risk. Keep the soil moist but not saturated.
Step 5: Control Temperature and Humidity
Most seeds germinate faster in warm, humid conditions.
Many growers use:
✔️ Humidity domes.
✔️ Heat mats.
✔️ Indoor grow lights.
Remove humidity domes after seedlings emerge. This improves airflow and reduces mold problems.
Step 6: Provide Enough Light
Seedlings need strong light immediately after germination.
Without enough light, seedlings become:
✅ Weak.
✅ Thin.
✅ Leggy.
Grow lights should stay close to the seedlings without overheating them.
Step 7: Thin Seedlings if Necessary
If multiple seeds sprout in one cell, remove weaker seedlings to reduce overcrowding. Keep the strongest plant in each cell.
Step 8: Transplant at the Right Time
Most seedlings are ready for transplanting after developing several true leaves. Do not leave seedlings in trays too long. Root-bound plants may struggle after transplanting.
How to Water Seed Trays?
Proper watering plays a major role in seed germination and seedling health. Too little water slows germination and weakens roots. Too much water increases the risk of mold, algae, and damping off. So Seed trays should stay evenly moist but never waterlogged.
Check Moisture Regularly
Young seedlings dry out quickly because seed trays contain small amounts of soil.
How often to water seedling trays? Check moisture daily, especially when using:
✔️ Heat mats.
✔️ Grow lights.
✔️ Small-cell trays.
✔️ Dry indoor environments.
The surface should feel slightly moist, not soggy.
Top Watering vs Bottom Watering
Many growers start with gentle top watering immediately after planting seeds. A spray bottle or fine watering can helps avoid disturbing the soil.
After germination, bottom watering often works better. Bottom watering allows roots to absorb moisture from below while keeping foliage drier. This method helps reduce fungal problems and encourages deeper root growth.
How to bottom water seedling trays?
✅ 1. Fill the bottom 1020 tray with water.
✅ 2. Let the soil absorb moisture for several minutes.
✅ 3. Remove excess water after soaking.
Do not leave trays sitting in standing water for long periods.
Avoid Overwatering
Overwatering is one of the most common seed-starting mistakes.
Excess moisture may cause:
✔️ Mold growth.
✔️ Algae buildup.
✔️ Fungus gnats.
✔️ Damping off disease.
✔️ Weak root systems.
Poor airflow can make these problems worse.
Watch for Underwatering
Dry soil can stop germination or kill young seedlings quickly.
Common signs include:
✅ Wilting.
✅ Dry soil surface.
✅ Slow growth.
✅ Curling leaves.
Small trays and biodegradable trays often dry out faster than deep plastic trays.
Adjust Watering as Seedlings Grow
Seedlings need more water as roots expand and leaves grow larger.
Warm temperatures, strong light, and airflow also increase water demand.
Indoor growers often water more frequently than outdoor growers.
👉 Need to improve watering habits? See our Seed Tray Watering Guide.
Best Conditions for Seed Germination
Seeds germinate best in stable environmental conditions. Temperature, humidity, airflow, and light all affect germination speed and seedling quality. Creating the right environment helps produce healthy, compact seedlings with strong roots.
Maintain Proper Temperature
Most vegetable and flower seeds germinate best between 65°F and 80°F.
Warm-season crops usually germinate faster with extra bottom heat. For example, tomatoes and peppers.
Many growers use seedling heat mats to maintain consistent soil temperatures.
Cool soil can slow or prevent germination.
Use Humidity Domes Carefully
Humidity domes help trap warmth and moisture during early germination.
They work especially well for:
✔️ Tomatoes.
✔️ Peppers.
✔️ Basil.
✔️ Flowers.
However, excess humidity may increase mold and fungal problems if airflow remains poor.
Remove the dome shortly after seedlings emerge.
Provide Good Airflow
Air circulation strengthens seedlings and reduces disease pressure.
Poor airflow often leads to:
✅ Mold.
✅ Algae.
✅ Damping off.
✅ Weak stems.
Small fans can improve airflow indoors and help seedlings grow sturdier stems.
Give Seedlings Enough Light
Most seedlings need strong light immediately after sprouting.
Without enough light, seedlings become:
✔️ Leggy.
✔️ Thin.
✔️ Weak.
✔️ Pale.
Indoor growers often use grow lights to maintain compact growth.
Keep lights close enough to the seedlings without causing heat stress.
Where to Put Seed Starter Trays?
Place seed trays in a warm, stable location away from cold drafts or sudden temperature swings.
Good locations include:
✅ Indoor shelving systems.
✅ Greenhouses.
✅ Controlled propagation areas.
Avoid placing trays in dark or overly cold spaces.
Monitor Moisture Levels
Environmental conditions directly affect watering frequency.
Heat mats, grow lights, and low humidity can dry trays quickly. High humidity and poor drainage may keep soil too wet.
Proper balance helps prevent common seedling problems.
How to Clean & Sterilize Seed Trays?
Cleaning seed trays helps prevent plant diseases, mold, algae, and fungal infections. Reusing dirty trays can spread pathogens from one growing season to the next. Many growers clean and sterilize trays before each new planting cycle.
Remove Old Soil and Debris
Start by removing leftover soil, roots, and plant debris from the tray.
Dry debris can harbor:
✔️ Fungal spores.
✔️ Bacteria.
✔️ Insect eggs.
✔️ Algae buildup.
Rinse the tray thoroughly with water before disinfecting it.
How to Clean Seed Trays?
Use warm water and mild soap to clean the tray surface.
Scrub corners and drainage holes carefully. Organic matter often collects there.
Heavy-duty reusable trays may need a stiff brush for proper cleaning.
How to Sterilize Seed Starting Trays?
After washing, sterilize the tray to reduce disease risk.
You can use:
✅ Diluted bleach solution.
✅ Hydrogen peroxide.
✅ Commercial disinfectants.
Allow trays to soak briefly. Rinse them well and let them dry completely before reuse.
Inspect for Damage
Cracked or damaged trays may trap moisture and bacteria. Broken trays can also reduce drainage efficiency. Replace trays that no longer drain properly.
Clean Accessories Too
Do not forget to clean:
✔️ Humidity domes.
✔️ Bottom watering trays.
✔️ Labels.
✔️ Tools.
✔️ Heat mats.
Dirty accessories may reintroduce pathogens to clean trays.
Proper sanitation greatly reduces problems such as:
✅ Mold.
✅ Damping off.
✅ Algae.
✅ Root diseases.
Allow trays to soak briefly. Then, rinse them well and let them dry completely before reuse.
👉 Want detailed sterilization methods and cleaning ratios? Read our full Seed Tray Cleaning & Sterilizing Guide.
When & How to Transplant Seedlings
Transplanting moves seedlings from seed trays into larger containers, raised beds, or garden soil. Proper timing and handling help reduce transplant shock and support healthy root growth.
Most seedlings are ready for transplanting after developing several true leaves. True leaves are also called cotyledons. They appear after the first small seed leaves.
When to Move Plants from Seed Trays?
Healthy seedlings usually show:
✔️ Strong stems.
✔️ Several true leaves.
✔️ Active root growth.
✔️ Compact shape.
✔️ Healthy green color.
Do not leave seedlings in trays too long. Root-bound seedlings may become stressed and grow slowly after transplanting.
Signs of root binding include:
✅ Roots circling the cell.
✅ Slow growth.
✅ Yellowing leaves.
✅ Drying out quickly.
Harden Off Seedlings
Indoor-grown seedlings need time to adjust to outdoor conditions.
Hardening off gradually exposes plants to:
✔️ Sunlight.
✔️ Wind.
✔️ Outdoor temperatures.
Start with a few hours outdoors each day. Increase exposure slowly over one to two weeks.
Skipping this step may cause:
✅ Wilting.
✅ Sunburn.
✅ Transplant shock.
✅ Stunted growth.
How to Remove Seedlings from Seed Trays?
Handle seedlings gently to avoid damaging stems and roots.
You should squeeze flexible trays lightly or push seedlings upward from the bottom drainage holes.
Hold seedlings by the leaves instead of the stem whenever possible.
Transplant Into Proper Soil
Choose loose, well-draining soil with enough moisture.
Water seedlings shortly before transplanting to reduce stress.
After transplanting:
✔️ Water thoroughly.
✔️ Protect from extreme sun or wind.
✔️ Keep soil evenly moist.
Watch for Transplant Shock
Some temporary stress is normal after transplanting.
Common symptoms include:
✅ Wilting.
✅ Slowed growth.
✅ Drooping leaves.
Most healthy seedlings recover within several days under proper conditions.
👉 Want detailed transplant timing and hardening-off tips? Read our complete Seedling Transplanting Guide.
Common Seed Tray Problems
Seed trays simplify seed starting, but problems can still occur. Most issues result from improper watering, poor airflow, weak lighting, or contaminated trays. Early prevention helps produce stronger and healthier seedlings.
Mold Growth
White fuzzy mold often appears on wet soil surfaces or humidity domes.
How to prevent mold in seedling trays? Common causes include:
✔️ Overwatering.
✔️ Poor airflow.
✔️ Excess humidity.
✔️ Dirty trays.
Improve ventilation and reduce excess moisture to control mold.
Damping Off
Damping off is a fungal disease. It kills young seedlings quickly.
Affected seedlings may:
✅ Collapse suddenly.
✅ Develop thin stems.
✅ Rot near the soil line.
Overwatering and contaminated trays greatly increase the risk.
Proper sanitation and airflow help prevent this disease.
Leggy Seedlings
Leggy seedlings grow tall, thin, and weak.
Insufficient light is the most common cause.
Keep grow lights close to seedlings and provide enough daily light exposure.
Overcrowding and excessive warmth may also contribute to weak growth.
Algae Growth
Green algae often forms on constantly wet soil surfaces.
Algae usually does not kill seedlings directly. It may indicate overly wet conditions and poor airflow.
Bottom watering and better ventilation often help reduce algae problems.
Fungus Gnats
Fungus gnats thrive in damp soil.
Adult gnats become a nuisance indoors. Larvae may damage roots in severe infestations.
Allowing the soil surface to dry slightly between watering helps reduce gnat populations.
Poor Germination
Low germination rates may result from:
✅ Old seeds.
✅ Incorrect planting depth.
✅ Cold temperatures.
✅ Dry soil.
✅ Excess moisture.
Some seeds also require specific conditions. For example, warmth, darkness, or light exposure.
Root Binding
Seedlings left too long in small trays may become root bound.
Roots begin circling inside the cell and struggle to expand after transplanting.
Use larger cells or transplant seedlings sooner when needed.
👉 Want detailed solutions for mold, damping off, and weak seedlings? Read our full Seed Tray Problems & Troubleshooting Guide.
Best Vegetables, Herbs & Flowers for Seed Trays
Many vegetables, herbs, and flowers grow well in seed trays. Starting seeds indoors helps growers extend the growing season and produce stronger transplants. Seed trays work best for crops that tolerate transplanting well.
Vegetables That Grow Well in Seed Trays
Many warm-season vegetables benefit from early indoor starting.
Popular choices include:
✅ Tomatoes.
✅ Peppers.
✅ Eggplant.
✅ Cucumbers.
✅ Squash.
✅ Broccoli.
✅ Cabbage.
✅ Lettuce.
These crops often develop stronger root systems and mature earlier when started indoors.
Herbs for Seed Trays
Many herbs germinate easily in trays and transplant successfully.
Common options include:
✔️ Basil.
✔️ Parsley.
✔️ Cilantro.
✔️ Oregano.
✔️ Thyme.
Small-cell trays work especially well for herbs.
Flowers for Seed Starting
Seed trays also support many annual and perennial flowers.
Popular flower choices include:
✅ Marigolds.
✅ Zinnias.
✅ Petunias.
✅ Cosmos.
✅ Salvia.
Starting flowers indoors often produces earlier blooms.
Crops That Usually Do Not Like Transplanting
Some root crops dislike root disturbance and often grow better when directly sown outdoors.
These include:
✔️ Carrots.
✔️ Parsnips.
✔️ Radishes.
✔️ Beets.
However, you can use deep trays for carrots when growing in small spaces or containers.
Seed Tray FAQs
How often should I water seed trays?
Most seed trays need daily moisture checks. Small cells dry out quickly under grow lights or heat mats. Keep the soil evenly moist but not soggy.
Should I use a humidity dome?
Humidity domes help retain warmth and moisture during germination. Remove the dome after seedlings sprout to improve airflow and reduce mold risk.
Can I reuse seed trays?
Yes. Many plastic and silicone trays are reusable for multiple seasons. Always clean and sterilize trays before reuse to reduce disease problems.
What is the best soil for seed trays?
Most seedlings are ready after developing several true leaves and strong root systems. Do not wait until plants become root bound.
Why are my seedlings falling over?
Sudden collapse near the soil line often indicates damping off disease. Excess moisture, poor airflow, and contaminated trays increase the risk.
Why are my seedlings leggy?
Leggy seedlings usually result from insufficient light. Move grow lights closer and improve airflow to encourage compact growth.
Can I start seeds without grow lights?
Yes, but natural window light may not provide enough intensity for strong seedling growth. Many indoor gardeners use grow lights for better results.
Are biodegradable trays better than plastic trays?
Both options have advantages. Biodegradable trays reduce transplant shock. Reusable plastic trays last longer and retain moisture more consistently.
What tray size should I use?
Small-cell trays work well for herbs and flowers. Larger vegetables usually need deeper cells and more root space.
Why is mold growing in my seed trays?
Mold usually develops from excess moisture, poor airflow, or dirty trays. Improve ventilation and avoid overwatering.
What temperature is best for seed germination?
Most seeds germinate well between 65°F and 80°F. Warm-season crops often benefit from heat mats.